본 포스팅은 스터디 모임의 발표 참고자료로 사용하기 위해 작성되었습니다.
RecyclerView
1. 개요
- Android 5.0에서 처음 소개되었으며 기존의 ListView를 보완한 고급 위젯
- Data Set을 아이템 단위로 ViewGroup을 구성 후 스크롤 가능한 리스트로 표시
- SupportLibrary에 포함되어 AndroidVersion 7 이상에서 사용 가능
2. 구현 원리
- RecyclerView는 LayoutManager를 통해서 View 표현 방식을 정의
- Adapter에서 Data의 ViewHolder 정의에 따라 UI를 선택해서 표현
- ViewHolder 패턴 적용을 통해 View의 재사용 가능(findViewByID 호출 저감)
3. Layout
- LinearLayout: 가로 / 세로 형태로 아이템 배치
- GridLayout: 격자 형태로 아이템 배치
- StaggeredGridLayout: Grid 형태에서 아이템 크기를 다양하게 적용 가능
4. Animation
- RecyclerView.ItemAnimator를 이용해서 Animator를 정의 가능
5. 기본 구조
- layout.xml: 재사용할 아이템의 형태 정의
- adapter.java: 아이템의 구현 내용을 정의
- model.java: 아이템에 사용할 데이터를 담을 모델 정의
- parent.java: RecyclerView를 표현할 부모 액티비티
6. 구현 실습
1) 프로젝트 구조


2) 의존성
- RecyclerView를 사용하기 위해서는 안드로이드 Support 라이브러리의 recyclerview 사용
- dependencies내에 아래 코드를 추가
implementation 'com.android.support:recyclerview-v7:28.0.0'
*app\build.gradle
apply plugin: 'com.android.application'
apply plugin: 'kotlin-android'
apply plugin: 'kotlin-android-extensions'

android {
    compileSdkVersion 28
    defaultConfig {
        applicationId "wlh.wickies.recyclerviewtest"
        minSdkVersion 15
        targetSdkVersion 28
        versionCode 1
        versionName "1.0"
        testInstrumentationRunner "android.support.test.runner.AndroidJUnitRunner"
    }
    buildTypes {
        release {
            minifyEnabled false
            proguardFiles getDefaultProguardFile('proguard-android-optimize.txt'), 'proguard-rules.pro'
        }
    }
}

repositories {
    mavenCentral()
    google()
}

dependencies {
    implementation fileTree(dir: 'libs', include: ['*.jar'])
    implementation"org.jetbrains.kotlin:kotlin-stdlib-jdk7:$kotlin_version"
    implementation 'com.android.support:appcompat-v7:28.0.0'
    implementation 'com.android.support.constraint:constraint-layout:1.1.3'
    testImplementation 'junit:junit:4.12'
    androidTestImplementation 'com.android.support.test:runner:1.0.2'
    androidTestImplementation 'com.android.support.test.espresso:espresso-core:3.0.2'

    // RecylcerView 의존성
    implementation 'com.android.support:recyclerview-v7:28.0.0'

    // 레이아웃으로 사용할 CardView
    implementation 'com.android.support:cardview-v7:28.0.0'

    // 이미지 출력용 Glide
    implementation 'com.github.bumptech.glide:glide:4.9.0'
    annotationProcessor 'com.github.bumptech.glide:compiler:4.9.0'
}
3) 레이아웃 정의
*rv_layout.xml
- 아이템들의 기본 형태를 정의
- 예제에는 타이틀과 이미지가 포함된 CardView를 사용했으나 다른 레이아웃을 사용해도 무방
<?xml version="1.0" encoding="utf-8"?>
<android.support.v7.widget.CardView
            xmlns:android="http://schemas.android.com/apk/res/android"
            android:layout_width="match_parent"
            android:layout_height="wrap_content"
            android:id="@+id/rv_cardview"
            android:layout_margin="10dp">

    <LinearLayout android:layout_width="match_parent"
                      android:layout_height="wrap_content"
                      android:orientation="vertical">

            <ImageView android:layout_width="match_parent"
                       android:layout_height="wrap_content"
                       android:id="@+id/rv_image"/>

            <TextView android:layout_width="wrap_content"
                      android:layout_height="wrap_content"
                      android:id="@+id/rv_title"
                      android:text="title"
                      android:textSize="15sp"
                      android:layout_gravity="center"
            />

    </LinearLayout>
</android.support.v7.widget.CardView>
*activity_main.xml
- 메인 액티비티에 RecyclerView를 추가
- 새로고침시 사용할 SwipeRefreshLayout내에 위치시킴(RecylcerView만 추가해도 무방)
<?xml version="1.0" encoding="utf-8"?>
<android.support.constraint.ConstraintLayout
        xmlns:android="http://schemas.android.com/apk/res/android"
        xmlns:tools="http://schemas.android.com/tools"
        android:layout_width="match_parent"
        android:layout_height="match_parent"
        tools:context=".MainActivity">

    <android.support.v4.widget.SwipeRefreshLayout android:layout_width="match_parent"
                                                  android:layout_height="match_parent"
                                                  android:id="@+id/swipe_refresh">
        <android.support.v7.widget.RecyclerView android:layout_width="match_parent"
                                                android:layout_height="match_parent"
                                                android:id="@+id/rv_layout"
        />
    </android.support.v4.widget.SwipeRefreshLayout>

</android.support.constraint.ConstraintLayout>
4) 모델 정의
- 아이템 내 사용할 데이터를 담기 위한 객체 모델을 정의
- 필수적인 사항은 아니지만 객체 모델 정의 후 리스트에 담아서 사용하면 편리함
*자바(CvModel.java)
public class CvModel {
   private String title;
   private String imageURI;

   CvModel(String title, String imageURI){
       this.title = title;
       this.imageURI = imageURI;
   }

   public String getTitle() {
       return title;
   }

   public String getImageURI() {
       return imageURI;
   }
}
*코틀린(Model.kt)
data class CvModel(val title:String, val imageURI: String)5) Adapter 정의
- RecyclerView.Adapter를 상속받아 클래스를 정의
- ViewHolder 내부 클래스: RecyclerView.ViewHolder 클래스를 상속받으며 재사용을 위해 뷰를 연결함
- 메소드 오버라이딩
onCreateViewHolder(): 정의된 뷰들을 객체화해서 부모 레이아웃에 전달
getItemCount(): 아이템의 크기를 반환
onBindViewHolder(): ViewHolder를 통해 데이터와 이벤트 연결 등 각종 연산 수행
*자바(RvAdapter.java)
public class RvAdapter extends RecyclerView.Adapter<RvAdapter.ViewHolder> {
   private ArrayList<CvModel> data; // 모델화된 데이터들을 리스트로 받아옴
   private Context context;

   RvAdapter(ArrayList<CvModel> data, Context context) { // 생성자
       this.data = data;
       this.context = context;
   }

   @Override
   public RvAdapter.ViewHolder onCreateViewHolder(ViewGroup parent, int viewType) {
       LayoutInflater inflater = (LayoutInflater) context.getSystemService(Context.LAYOUT_INFLATER_SERVICE);
       // Adapter 내부에 정의된 ViewHolder에 정의된 레이아웃을 inflate해서 반환
       return new RvAdapter.ViewHolder(inflater.inflate(R.layout.rv_layout, parent, false));
   }

   @Override
   public int getItemCount() { // 아이템의 개수 반환
       return data.size() ;
   }

   @Override
   public void onBindViewHolder(RvAdapter.ViewHolder holder, int position) {
       // ViewHolder에 정의된 텍스트뷰에 데이터의 텍스트를 출력
       holder.rv_title.setText(data.get(position).getTitle());
       // ViewHolder에 정의된 이미지뷰에 데이터의 이미지 경로의 이미지 출력
       Glide.with(context).load(data.get(position).getImageURI()).override(1024).into(holder.rv_image);
   }

   // ViewHolder 클래스 정의를 통해 Adapter에서 사용할 뷰들을 연결
   public class ViewHolder extends RecyclerView.ViewHolder {
       TextView rv_title;
       ImageView rv_image;

       ViewHolder(View itemView) {
           super(itemView);
           rv_title = itemView.findViewById(R.id.rv_title);
           rv_image = itemView.findViewById(R.id.rv_image);
       }
   }
}
*코틀린(RvAdapter.kt)
class RvAdapter(val data: ArrayList<CvModel>, val context: Context): RecyclerView.Adapter<RvAdapter.ViewHolder>() {
   override fun onCreateViewHolder(p0: ViewGroup, p1: Int)
   = ViewHolder(LayoutInflater.from(context).inflate(R.layout.rv_layout, p0, false))

   override fun getItemCount(): Int = data.size

   override fun onBindViewHolder(p0: ViewHolder, p1: Int) {
       p0.rv_title.text = data[p1].title
       Glide.with(context).load(data[p1].imageURI).override(1024).into(p0.rv_image)
   }

   class ViewHolder(itemView: View) : RecyclerView.ViewHolder(itemView){
       val rv_title = itemView.findViewById<TextView>(R.id.rv_title)
       val rv_image = itemView.findViewById<ImageView>(R.id.rv_image)
   }
}
6) 부모 액티비티에 RecyclerView 연결
- RecyclerView에 사용할 Layout과 Adapter를 지정
- 예제에는 메인액티비티에 연결했으나 어떤 액티비티에 연결해도 무관
- RecyclerView 내에 중첩해서 정의도 가능
- 해당 예제에는 새로고침시 레이아웃이 변경되는 코드가 포함되어있음(필수 사항 아님)
*자바(MainActivity.java)
public class MainActivity extends AppCompatActivity {
   Boolean swtich_bool = false;

   @Override
   protected void onCreate(Bundle savedInstanceState) {
       super.onCreate(savedInstanceState);
       setContentView(R.layout.activity_main);

// ========== RecyclerView 연결 영역 ==========

       final RecyclerView rv_layout = findViewById(R.id.rv_layout);
       // RecyclerView의 레이아웃 매니저를 통해 레이아웃 정의
       rv_layout.setLayoutManager(new LinearLayoutManager(this, LinearLayoutManager.VERTICAL, false));
       // RecyclerView에 정의한 Adapter를 연결
       rv_layout.setAdapter(new RvAdapter(data, this));

// ========== SwipeRefresh 정의 영역 ==========

       final SwipeRefreshLayout swipe_refresh = findViewById(R.id.swipe_refresh);
       final Context context = this;
       swipe_refresh.setOnRefreshListener(new SwipeRefreshLayout.OnRefreshListener() {
           @Override
           public void onRefresh() {
               if(swtich_bool) rv_layout.setLayoutManager(new LinearLayoutManager(context, LinearLayoutManager.VERTICAL, false));
               else rv_layout.setLayoutManager(new GridLayoutManager(context, 2));
               swtich_bool = !swtich_bool;
               swipe_refresh.setRefreshing(false);
           }
       });
   }

// ========== 테스트용 데이터 정의 영역 ==========

   ArrayList<CvModel> data = new ArrayList<CvModel>(Arrays.asList(
           new CvModel("잘생긴 새", "https://images.unsplash.com/reserve/iZkDQMqeQlqhoCIywoFv_6005485056_c8622e0824_o.jpg?ixlib=rb-1.2.1&auto=format&fit=crop&w=500&q=60"),
           new CvModel("조용한 바다", "https://images.unsplash.com/photo-1464254786740-b97e5420c299?ixlib=rb-1.2.1&auto=format&fit=crop&w=500&q=60"),
           new CvModel("시계", "https://images.unsplash.com/photo-1470472304068-4398a9daab00?ixlib=rb-1.2.1&auto=format&fit=crop&w=500&q=60"),
           new CvModel("구름낀 바다", "https://images.unsplash.com/photo-1500408921219-79e2a10faaff?ixlib=rb-1.2.1&auto=format&fit=crop&w=500&q=60"),
           new CvModel("석양", "https://images.unsplash.com/photo-1464061884326-64f6ebd57f83?ixlib=rb-1.2.1&ixid=eyJhcHBfaWQiOjExMjU4fQ&auto=format&fit=crop&w=500&q=60"),
           new CvModel("무지개 폭포", "https://images.unsplash.com/photo-1488711500009-f9111944b1ab?ixlib=rb-1.2.1&auto=format&fit=crop&w=500&q=60"),
           new CvModel("배낭여행자", "https://images.unsplash.com/reserve/91JuTaUSKaMh2yjB1C4A_IMG_9284.jpg?ixlib=rb-1.2.1&auto=format&fit=crop&w=500&q=60"),
           new CvModel("능선따라 걷기", "https://images.unsplash.com/photo-1465188162913-8fb5709d6d57?ixlib=rb-1.2.1&auto=format&fit=crop&w=500&q=60"),
           new CvModel("황량한 도로", "https://images.unsplash.com/photo-1486720912533-796a026d93ed?ixlib=rb-1.2.1&ixid=eyJhcHBfaWQiOjIxMTIzfQ&auto=format&fit=crop&w=500&q=60"),
           new CvModel("갬성 자전거", "https://images.unsplash.com/photo-1522442902874-270c4b3a04df?ixlib=rb-1.2.1&auto=format&fit=crop&w=500&q=60"),
           new CvModel("거친 파도", "https://images.unsplash.com/photo-1489617482379-fc98cdb77efb?ixlib=rb-1.2.1&auto=format&fit=crop&w=500&q=60")
   ));


}
*코틀린(MainActivity.kt)
class MainActivity : AppCompatActivity() {
   var switch_bool = false

   override fun onCreate(savedInstanceState: Bundle?) {
       super.onCreate(savedInstanceState)
       setContentView(R.layout.activity_main)

       rv_layout.layoutManager = LinearLayoutManager(this, LinearLayoutManager.VERTICAL, false)
       rv_layout.adapter = RvAdapter(data, this)

       swipe_refresh.setOnRefreshListener {
           rv_layout.layoutManager = if(switch_bool) LinearLayoutManager(this, LinearLayoutManager.VERTICAL, false)
           else GridLayoutManager(this, 2)
           switch_bool = !switch_bool
           swipe_refresh.isRefreshing = false
       }
   }

   val data = arrayListOf(
           CvModel("잘생긴 새", "https://images.unsplash.com/reserve/iZkDQMqeQlqhoCIywoFv_6005485056_c8622e0824_o.jpg?ixlib=rb-1.2.1&auto=format&fit=crop&w=500&q=60"),
           CvModel("조용한 바다", "https://images.unsplash.com/photo-1464254786740-b97e5420c299?ixlib=rb-1.2.1&auto=format&fit=crop&w=500&q=60"),
           CvModel("시계", "https://images.unsplash.com/photo-1470472304068-4398a9daab00?ixlib=rb-1.2.1&auto=format&fit=crop&w=500&q=60"),
           CvModel("구름낀 바다", "https://images.unsplash.com/photo-1500408921219-79e2a10faaff?ixlib=rb-1.2.1&auto=format&fit=crop&w=500&q=60"),
           CvModel("석양", "https://images.unsplash.com/photo-1464061884326-64f6ebd57f83?ixlib=rb-1.2.1&ixid=eyJhcHBfaWQiOjExMjU4fQ&auto=format&fit=crop&w=500&q=60"),
           CvModel("무지개 폭포", "https://images.unsplash.com/photo-1488711500009-f9111944b1ab?ixlib=rb-1.2.1&auto=format&fit=crop&w=500&q=60"),
           CvModel("배낭여행자", "https://images.unsplash.com/reserve/91JuTaUSKaMh2yjB1C4A_IMG_9284.jpg?ixlib=rb-1.2.1&auto=format&fit=crop&w=500&q=60"),
           CvModel("능선따라 걷기", "https://images.unsplash.com/photo-1465188162913-8fb5709d6d57?ixlib=rb-1.2.1&auto=format&fit=crop&w=500&q=60"),
           CvModel("황량한 도로", "https://images.unsplash.com/photo-1486720912533-796a026d93ed?ixlib=rb-1.2.1&ixid=eyJhcHBfaWQiOjIxMTIzfQ&auto=format&fit=crop&w=500&q=60"),
           CvModel("갬성 자전거", "https://images.unsplash.com/photo-1522442902874-270c4b3a04df?ixlib=rb-1.2.1&auto=format&fit=crop&w=500&q=60"),
           CvModel("거친 파도", "https://images.unsplash.com/photo-1489617482379-fc98cdb77efb?ixlib=rb-1.2.1&auto=format&fit=crop&w=500&q=60")
           )
}
7) 권한 설정
- 웹 상의 이미지를 참조하기 때문에 인터넷 권한 설정이 필요함
*AndroidManifest.xml
<?xml version="1.0" encoding="utf-8"?>
<manifest xmlns:android="http://schemas.android.com/apk/res/android"
package="wlh.wickies.recyclerviewtest">
<!-- 인터넷 사용 권한 추가 -->
<uses-permission android:name="android.permission.INTERNET"/>
<application
android:allowBackup="true"
android:icon="@mipmap/ic_launcher"
android:label="@string/app_name"
android:roundIcon="@mipmap/ic_launcher_round"
android:supportsRtl="true"
android:theme="@style/AppTheme">
<activity android:name=".MainActivity">
<intent-filter>
<action android:name="android.intent.action.MAIN"/>
<category android:name="android.intent.category.LAUNCHER"/>
</intent-filter>
</activity>
</application>
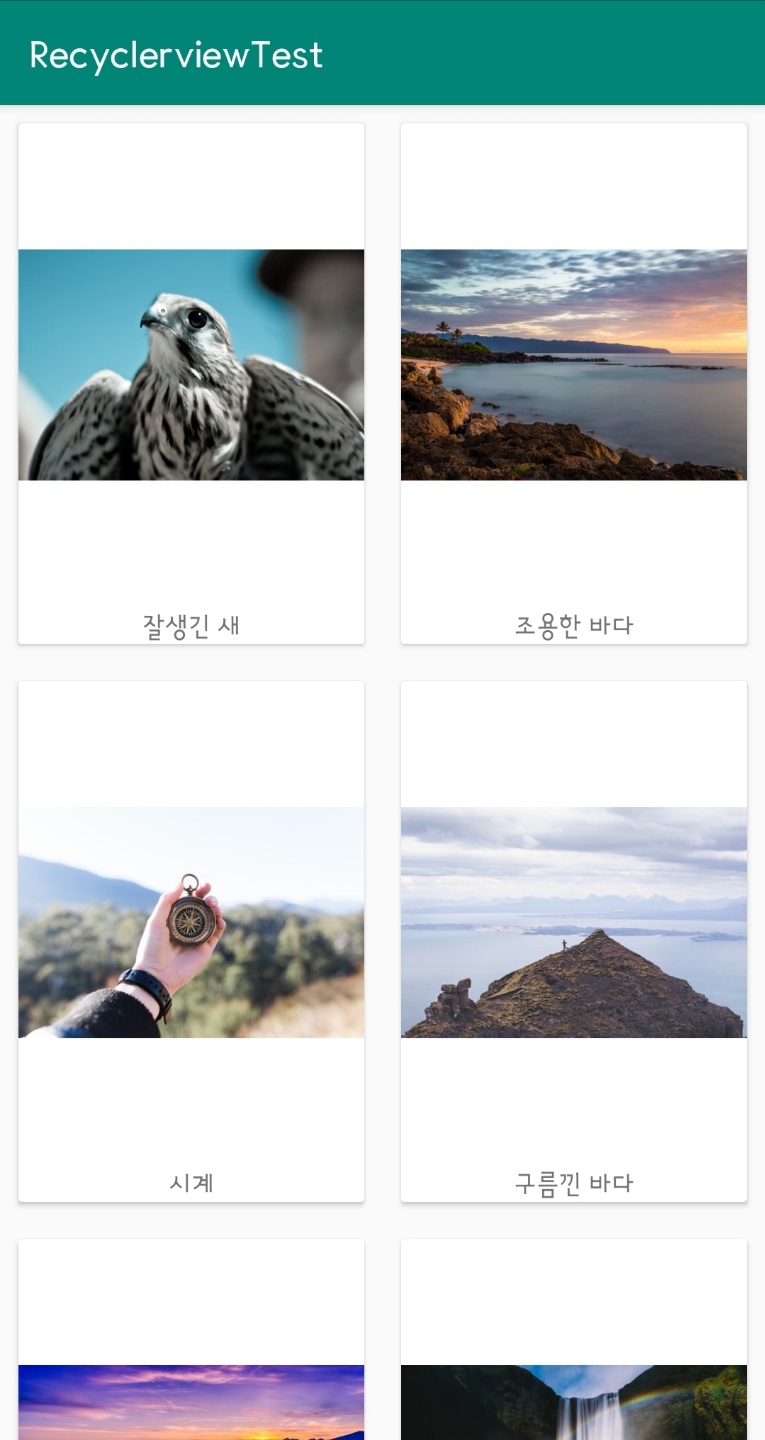
</manifest>8) 실행 화면


7. 빠른 성능을 위한 Tip
1) EditText와 같은 Input 필드를 뷰 홀더에 넣지 않는다.
2) OnBindViewHolder를 가능한 가볍게 만든다.
3) 뷰가 미리 한번에 출력되는게 아니라 스크롤시 위치에 맞게 표시된다. 표시되기 전에 미리 준비하는 작업을 거치는데 그 작업을 할 수 있도록 데이터를 미리 준비시킨다.
4) 어댑터 내에서 요청을 보내지 않고 어댑터를 읽어오기 전에 미리 데이터를 받아온다.
5) RecyclerView에서 mRecyclerView.setHasFixedSize(true)를 설정한다.
6) 어댑터에서 setHasStableIds(true)를 설정한다.
7) DataBinder를 사용해서 필요없는 리소스를 제거한다.
'프로그래밍 > Android' 카테고리의 다른 글
| [REST API 실습] 5. 안드로이드 앱에서 Retrofit을 사용해서 REST API와 통신하기(CRUD 구현) (2) | 2019.05.12 |
|---|
